Developer Guide
Welcome to the ThunderCat Developer Guide.
ThunderCat is a desktop app designed for Year 2 Computing Students and acts as an address book for contacts with added support for group projects. Users can manage contacts, organise them into project groups and manage their tasks according to those groups.
This guide contains detailed information on the architecture, implementation and design decisions for ThunderCat. This guide has been designed for our intended audience of software testers and developers who are interested in the inner workings of ThunderCat, or those who seek to alter and extend the app for their own use.
- Acknowledgements
- Setting up, getting started
- Design
- Implementation
- Documentation, logging, testing, configuration, dev-ops
- Appendix: Requirements
- Appendix: Instructions for manual testing
- Effort
Acknowledgements
This project is based on the AddressBook Level-3 project created by the SE-EDU initiative.
Setting up, getting started
Refer to the guide Setting up and getting started.
Design
.puml files used to create diagrams in this document can be found in the diagrams folder. Refer to the PlantUML Tutorial at se-edu/guides to learn how to create and edit diagrams.
Architecture
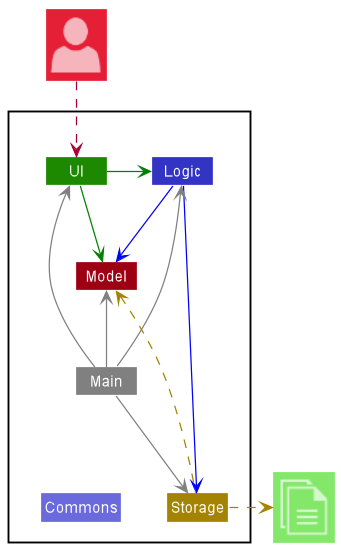
The Architecture Diagram given above explains the high-level design of the App.
Given below is a quick overview of main components and how they interact with each other.
Main components of the architecture
Main has two classes called Main and MainApp. It is responsible for,
- At app launch: Initializes the components in the correct sequence, and connects them up with each other.
- At shut down: Shuts down the components and invokes cleanup methods where necessary.
Commons represents a collection of classes used by multiple other components.
The rest of the App consists of four components.
-
UI: The UI of the App. -
Logic: The command executor. -
Model: Holds the data of the App in memory. -
Storage: Reads data from, and writes data to, the hard disk.
How the architecture components interact with each other
The Sequence Diagram below shows how the components interact with each other for the scenario where the user issues the command delete 1.
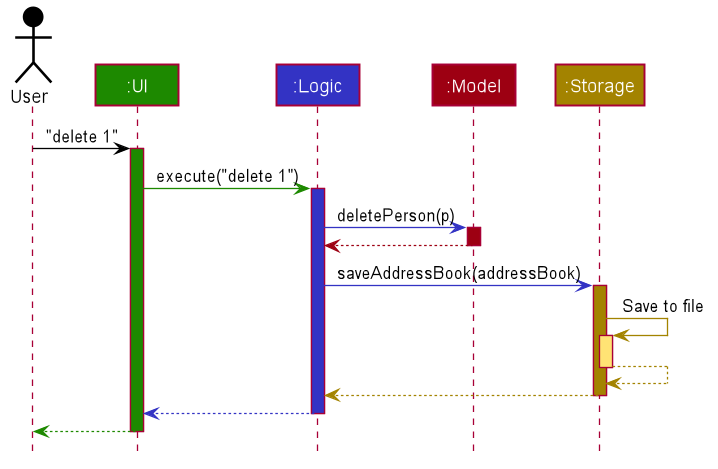
Each of the four main components (also shown in the diagram above),
- defines its API in an
interfacewith the same name as the Component. - implements its functionality using a concrete
{Component Name}Managerclass (which follows the corresponding APIinterfacementioned in the previous point.
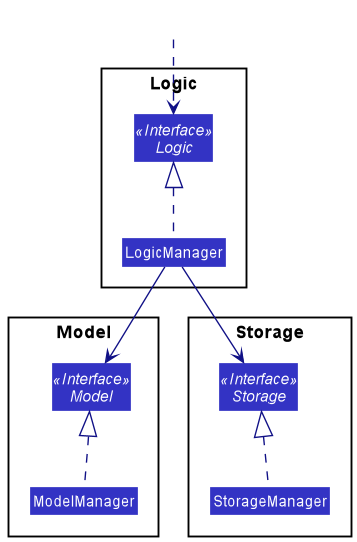
For example, the Logic component defines its API in the Logic.java interface and implements its functionality using the LogicManager.java class which follows the Logic interface. Other components interact with a given component through its interface rather than the concrete class (reason: to prevent outside component’s being coupled to the implementation of a component), as illustrated in the (partial) class diagram below.
The sections below give more details of each component.
UI component
The API of this component is specified in Ui.java
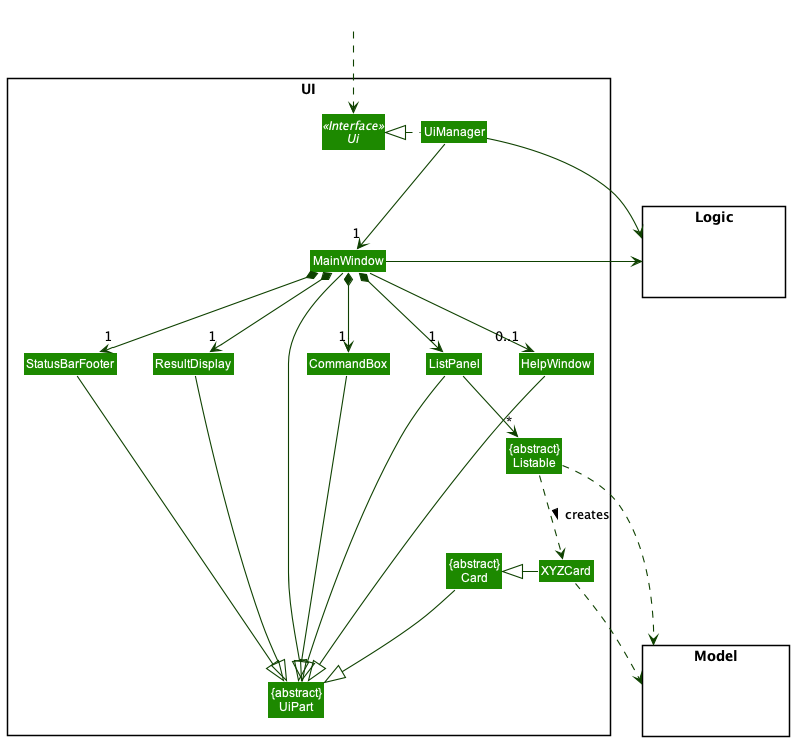
The UI consists of a MainWindow that is made up of parts e.g.CommandBox, ResultDisplay, ListPanel, StatusBarFooter etc. All these, including the MainWindow, inherit from the abstract UiPart class which captures the commonalities between classes that represent parts of the visible GUI.
The UI component uses the JavaFx UI framework. The layout of these UI parts are defined in matching .fxml files that are in the src/main/resources/view folder. For example, the layout of the MainWindow is specified in MainWindow.fxml
The UI component,
- executes user commands using the
Logiccomponent. - listens for changes to
Modeldata so that the UI can be updated with the modified data. - keeps a reference to the
Logiccomponent, because theUIrelies on theLogicto execute commands. - depends on some classes in the
Modelcomponent, as it displaysPerson,Group,Taskobjects residing in theModel.
Logic component
API : Logic.java
Here’s a (partial) class diagram of the Logic component:

How the Logic component works when executing a command:
- When
Logicis called upon to execute a command, it uses theAddressBookParserclass to parse the user command. - The
AddressBookParserclass may then call otherParserclasses to parse specific commands. - This results in a
Commandobject (more precisely, an object of one of the classes that implement it e.g.,AddCommand). - The
Commandobject is checked if it can be executed in the currentApplicationState. - If it cannot be executed, then a
CommandExceptionis thrown and theCommandobject is not executed. Otherwise, if it can run in the currentApplicationState, then theCommandobject is executed by theLogicManager. - The command can communicate with the
Modelwhen it is executed (e.g. to add a person). - The result of the command execution is encapsulated as a
CommandResultobject which is returned fromLogic. - The current
ApplicationStateis updated using the details from theCommandResult.
The Sequence Diagram below illustrates the interactions within the Logic component for the execute("delete 1") API call, assuming the application is in a state where it can execute the delete command.
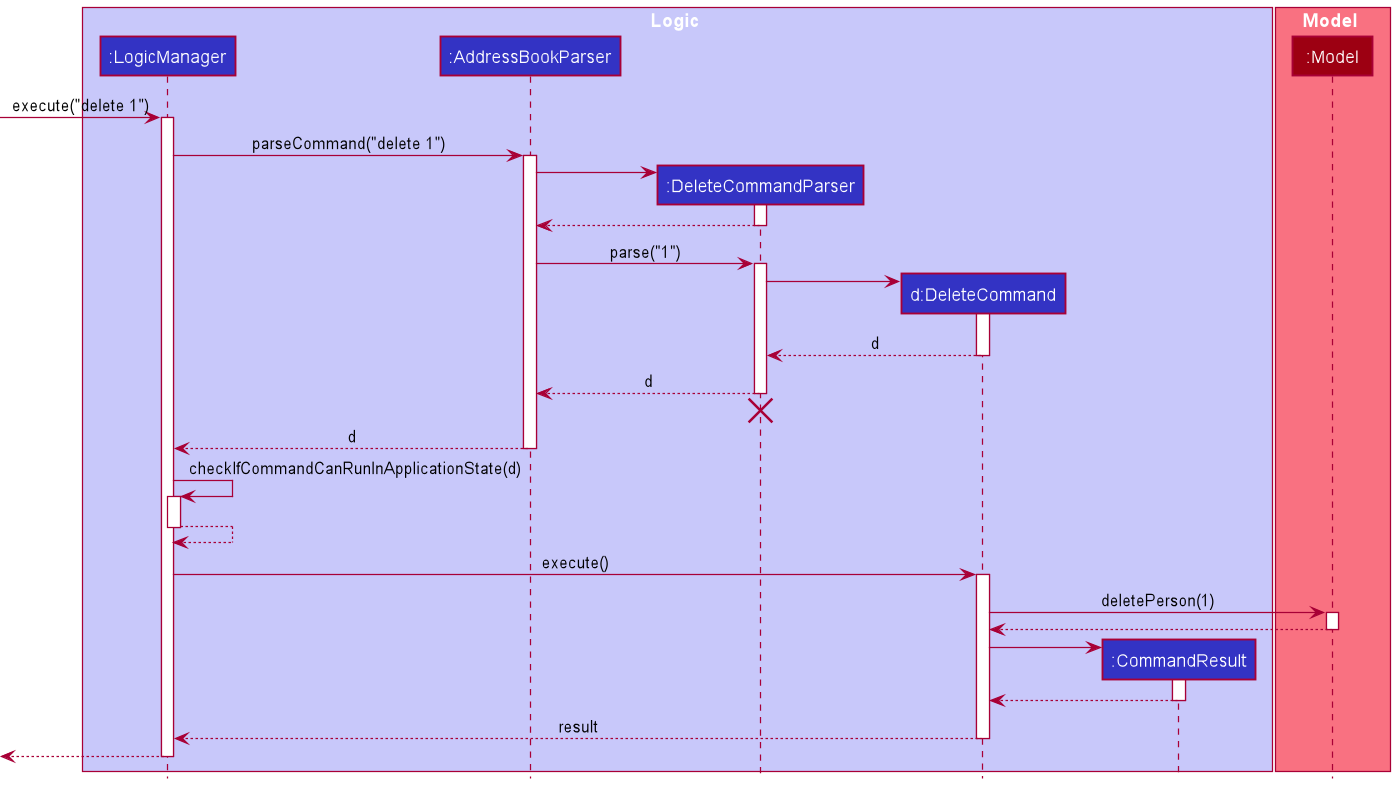
DeleteCommandParser should end at the destroy marker (X) but due to a limitation of PlantUML, the lifeline reaches the end of diagram.
Parser classes
Here are the other classes in Logic (omitted from the class diagram above) that are used for parsing a user command:
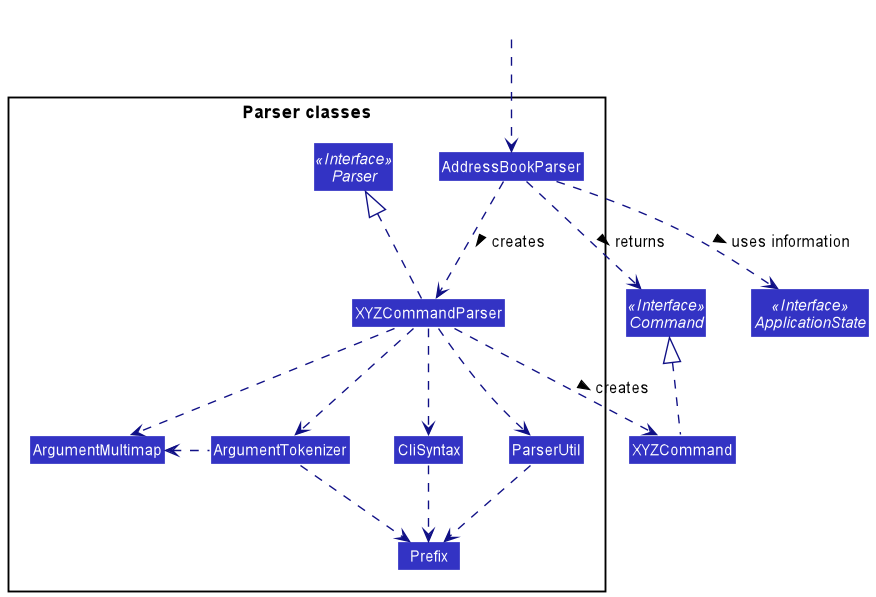
How the parsing works:
- When called upon to parse a user command, the
AddressBookParserclass creates anXYZCommandParser(XYZis a placeholder for the specific command name e.g.,AddCommandParser) which uses the other classes shown above to parse the user command and create aXYZCommandobject (e.g.,AddCommand) which theAddressBookParserreturns back as aCommandobject. - While parsing, the
AddressBookParsermay use information from theApplicationStatesuch as what type of state it is or what data it is storing. Stored data can include things likeGroupobjects. - All
XYZCommandParserclasses (e.g.,AddCommandParser,DeleteCommandParser, …) inherit from theParserinterface so that they can be treated similarly where possible e.g, during testing.
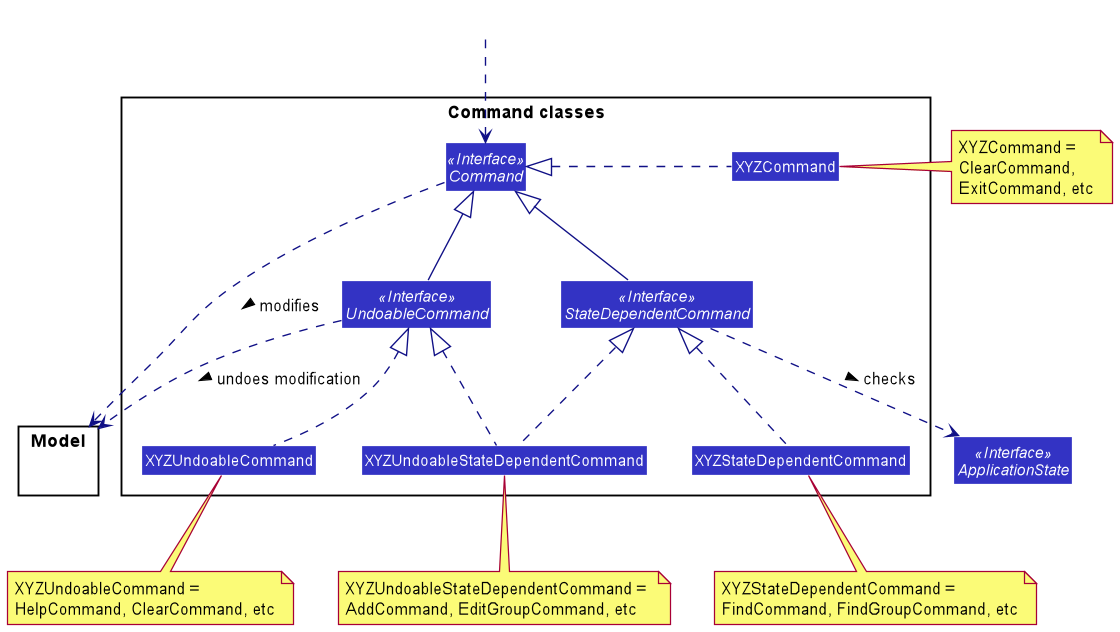
Command classes
There are different Command sub-types:
- Any implementation of
UndoableCommandcan be undone. After they execute and modify the contents ofModel, they can undo these modifications. - Any implementation of
StateDependentCommandcan check whatApplicationStatethe application is currently in and allow itself to be executed if the command can run in thatApplicationState, or instead block execution.
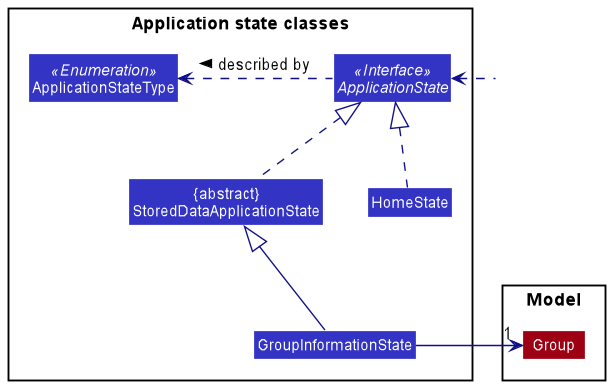
Application state classes
In order to keep track of when the application is on the Home Page or the Group Information Page, the application keeps track of what state it is currently in or what state it will be in after a Command is executed. The ApplicationState interface is used for this purpose. There are different ApplicationState sub-types:
- The
HomeStaterefers to the state the application is in when it is showing the Home Page. - The
StoredDataApplicationStateis anApplicationStatesub-type that can store data to be used by the components of the application. - The
GroupInformationStaterefers to the state the application is in when it is showing the Group Information Page. It stores theGroupobject representing the group that is being displayed in the Group Information Page. ThisGroupobject can be used byCommandimplementations to perform operations on the object or by theUicomponent for displaying the group’s details.
Model component
API : Model.java
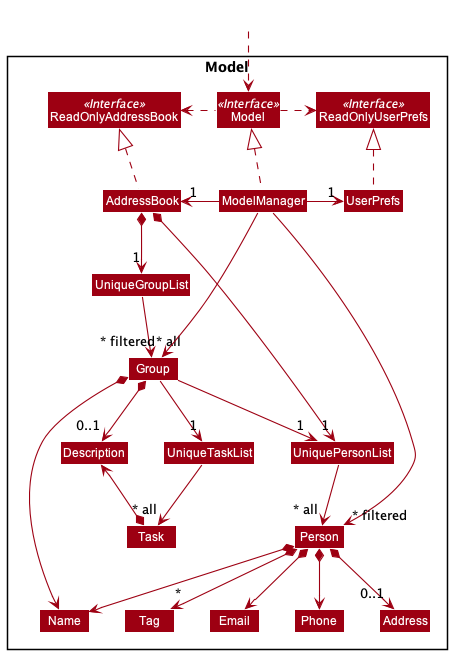
The Model component,
- stores the ThunderCat data i.e.
- all
Personobjects (which are contained in aUniquePersonListobject). - all
Groupobjects (which are contained in aUniqueGroupListobject). - all
Taskobjects (which are contained in aUniqueTaskListobject).
- all
- stores the currently ‘selected’
Personobjects (e.g., results of a search query) as a separate filtered list which is exposed to outsiders as an unmodifiableObservableList<Person>that can be ‘observed’ e.g. the UI can be bound to this list so that the UI automatically updates when the data in the list change. - works similarly for the
Groupobjects. - stores a
UserPrefobject that represents the user’s preferences. This is exposed to the outside as aReadOnlyUserPrefobjects. - does not depend on any of the other three components (as the
Modelrepresents data entities of the domain, they should make sense on their own without depending on other components) - UniqueTaskList is stored inside every group
Tag list in the AddressBook, which Person references. This allows AddressBook to only require one Tag object per unique tag, instead of each Person needing their own Tag objects.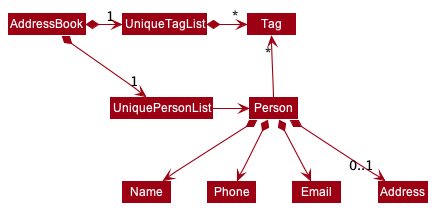
Storage component
API : Storage.java
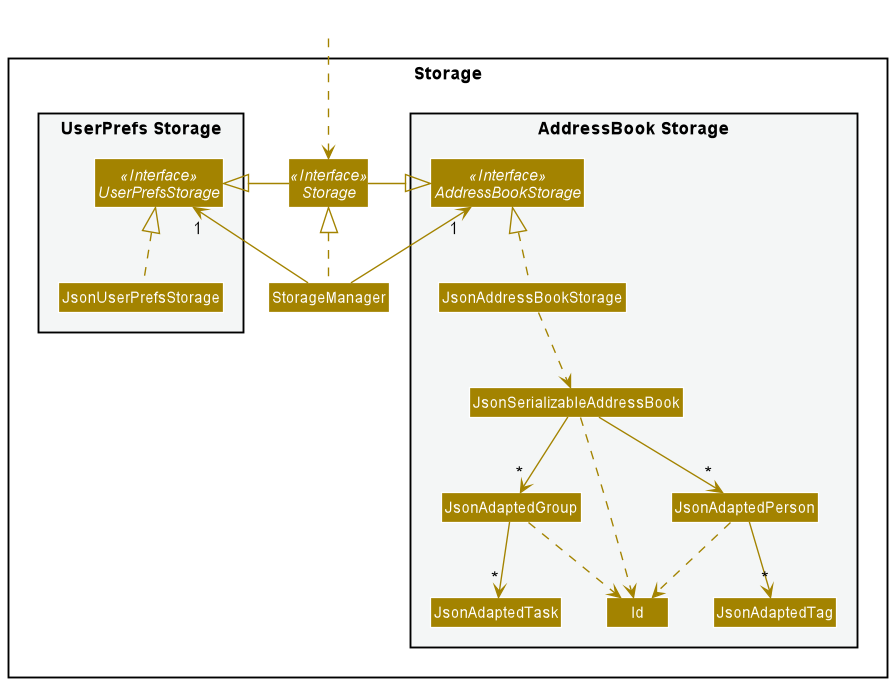
The Storage component,
- can save both address book data and user preference data in json format, and read them back into corresponding objects.
- inherits from both
AddressBookStorageandUserPrefStorage, which means it can be treated as either one (if only the functionality of only one is needed). - depends on some classes in the
Modelcomponent (because theStoragecomponent’s job is to save/retrieve objects that belong to theModel)
Common classes
Classes used by multiple components are in the seedu.addressbook.commons package.
Implementation
This section describes some noteworthy details on how certain features are implemented.
Mark As Done Command (Task)
The mark-as-done mechanism is facilitated by MarkAsDoneCommand and MarkAsDoneCommandParser. This command allows users to mark a task in a group as done.
Implementation
Given below is an example usage scenario and how the done mechanism behaves at each step.
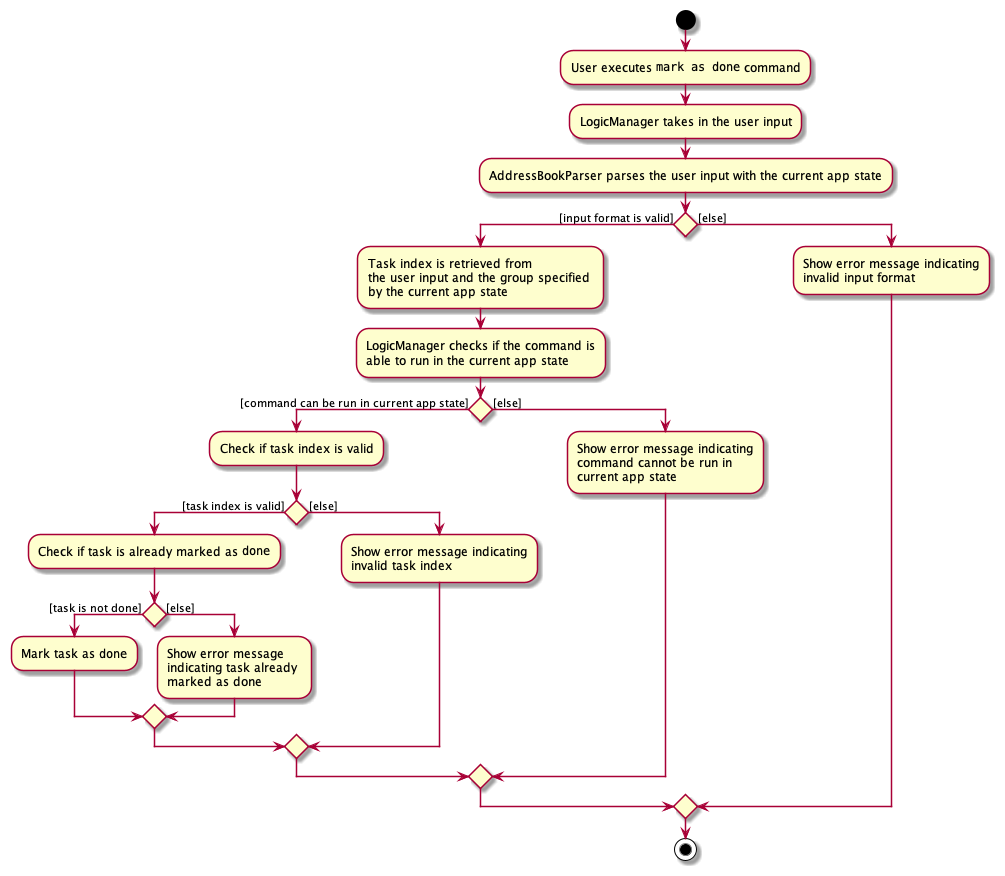
- User enters the
done INDEXcommand, and the user input is taken intoLogicManager#execute(String commandText). -
LogicManagercallsAddressBookParser#parseCommand(String userInput, ApplicationState currentApplicationState)which parses the user input along with the current application state. -
MarkAsDoneCommandParser#parse(String args)retrieves the task index from the arguments parsed, as well as the group specified by the current application state. - A new
MarkAsDoneCommandobject will be created with the task index and the group. -
LogicManager#execute(String commandText)checks if this command object is able to run in the current application state. This operation is exposed in theLogicManagerclass asLogicManager#checkIfCommandCanRunInApplicationState(Command command). - If the command is able to run,
MarkAsDoneCommand#execute(Model model)will check if the task index is a valid index (Ie if the task index is within the bounds of the indices of the task list). If it is not valid, an error message will be displayed. -
If the task index is valid, the task’s done status is retrieved and marked as done. This operation is exposed in the Task class as
Task#setDoneTask().- Note: If the task has already been marked as done, an error message will be displayed.
- The
CommandResultof the execution will then be retrieved, and the display will change to show the result of the execution.
The following activity diagram shows the workflow of a typical MarkAsDoneCommand:
Design Considerations
Aspect: How done executes:
- Alternative 1: If the task is already marked as done,
donecommand simply toggles thedonestatus tonot done.- Cons: May mark a done task as
not doneif User accidentally calls the command twice. - Pros: Allows User to toggle between
doneandnot doneif they realise that a task was previously accidentally marked as done.
- Cons: May mark a done task as
- Alternative 2 (current implementation): If the task is already marked as done, display error message.
- Pros: Simple and more intuitive for the user, prevents user from accidentally entering duplicate
donecommands. - Cons: No option to reverse the
donestatus of a task if task has been accidentally marked asdone. To rectify this, we have added anundocommand to prevent such situation.
- Pros: Simple and more intuitive for the user, prevents user from accidentally entering duplicate
Add Task Command
The add-task mechanism is facilitated by AddTaskCommand and AddTaskCommandParser. This command allows users to add a task into the tasklist of a group.
Implementation
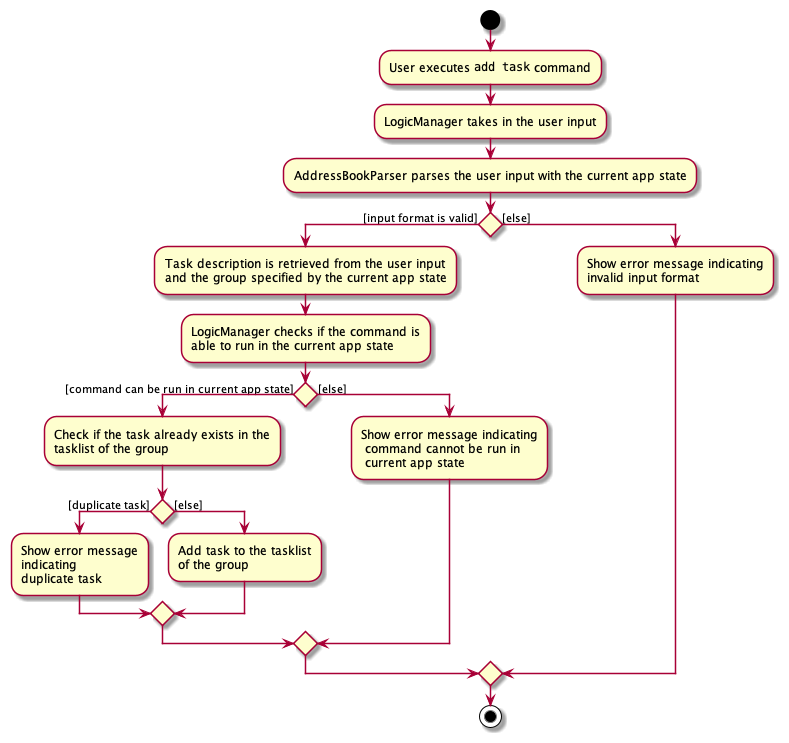
Given below is an example usage scenario and how the addT mechanism behaves at each step.
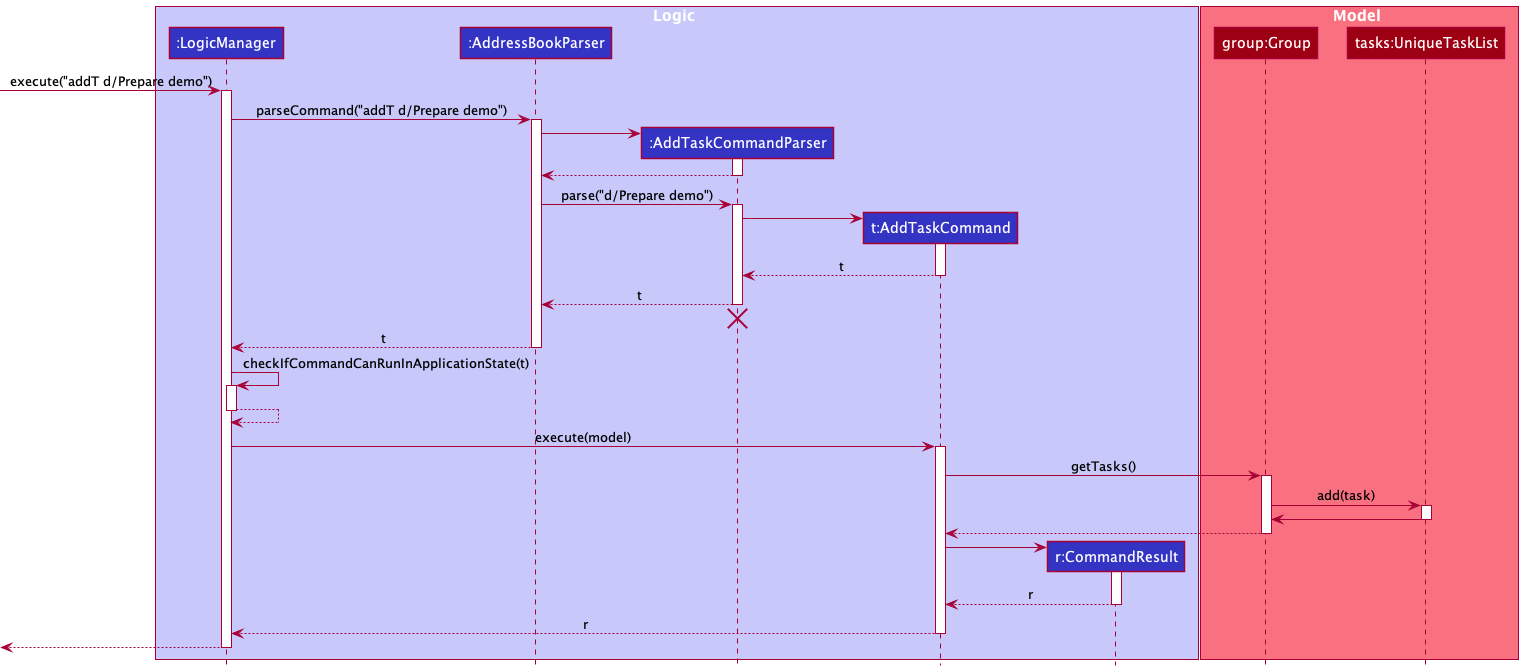
- User enters the
addT d/TASK_DESCRIPTIONcommand, and the user input is taken intoLogicManager#execute(String commandText). -
LogicManagercallsAddressBookParser#parseCommand(String userInput, ApplicationState currentApplicationState)which parses the user input along with the current application state. -
AddTaskCommandParser#parse(String args)retrieves the task description from the arguments parsed, as well as the group specified by the current application state. - A new
AddTaskCommandobject will be created with the group and a newTaskobject created with the task description. -
LogicManager#execute(String commandText)checks if this command object is able to run in the current application state. This operation is exposed in theLogicManagerclass asLogicManager#checkIfCommandCanRunInApplicationState(Command command). - If the command is able to run,
AddTaskCommand#execute(Model model)will check if a task with the same description already exists in the tasklist of the group. If such task already exists, an error message indicating duplicate tasks entered will be displayed. - If the task is not a duplicate task, it is added to the tasklist of the group successfully. This operation is exposed in the UniqueTaskList class as
UniqueTaskList#add(Task toAdd). - The
CommandResultof the execution will then be retrieved, and the display will change to show the result of the execution.
The following sequence diagram illustrates how the addT operation works, assuming no exception is thrown:
The following activity diagram shows the workflow of a typical AddTaskCommand:
Undo feature
Implementation
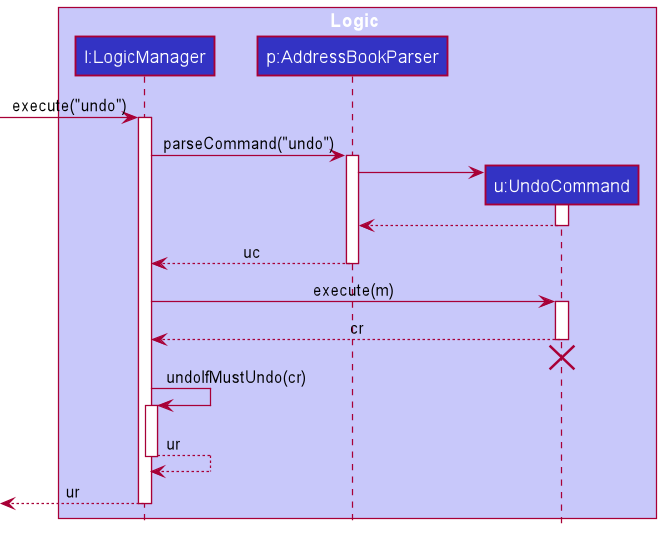
The execution of the undo command is enabled by the CommandResult and the LogicManager classes, which then leads to the execution of the undo method in the appropriate UndoableCommand.
The undo command is first started when the execute method of the LogicManager object l is called. l calls the parseCommand method of the AddressBookParser object p which creates and returns an UndoCommand object u. Then l calls the execute method of u, which returns to l a CommandResult object cr which has its isGoingToCauseUndo boolean variable set to true. After that, l calls its own undoIfMustUndo method to actually cause any undoable modifications carried out by an UndoableCommand object uc to be undone. The undoIfMustUndo method returns the CommandResult object ur which is the result of undoing the undoable modifications. Finally, ur is returned by the execute method of l.
cr is constructed by first creating a CommandResult.Builder object b, because CommandResult uses the builder software engineering pattern. The goCauseUndo method of b is called in order to set isGoingToCauseUndo to true for cr when it is eventually constructed. Then the build method of b is called to finally construct cr, which is returned to u. Then the execute method of u returns cr to l.

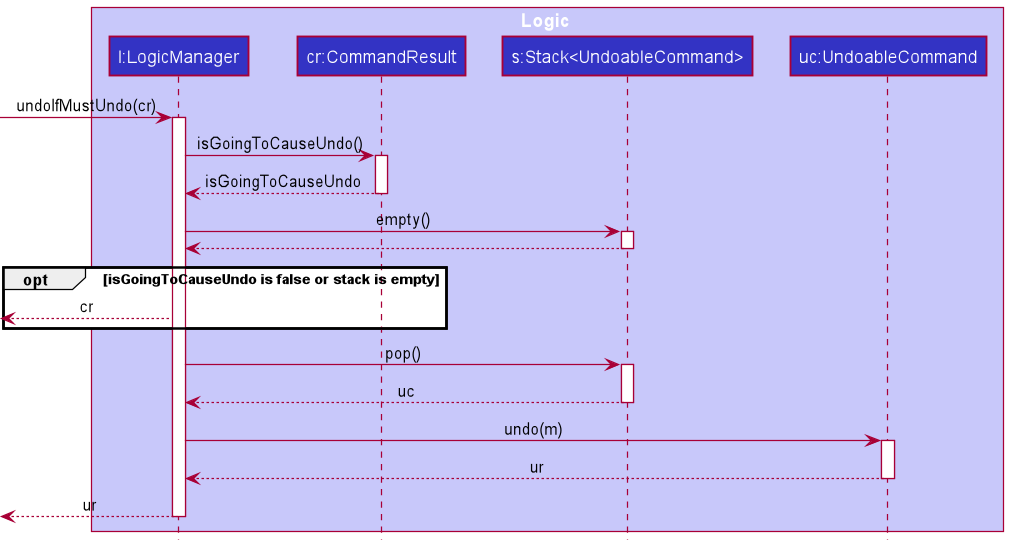
When the undoIfMustUndo method of l is called, l first checks if cr has isGoingToCauseUndo set to true. l also checks if the Stack<UndoableCommand> object s, which is a stack of UndoableCommand objects, is empty. If isGoingToCauseUndo is false, then there is no need to undo anything at all. Alternatively, if s is empty, then there is no UndoableCommand object that can be undone. In either case or if both occur, then undoIfMustUndo just returns cr immediately because there is no need to undo. Otherwise, if isGoingToCauseUndo is true and s is not empty, then there is an UndoableCommand object uc that can be undone, and it must be undone. This is carried out by calling the undo method of uc, which returns a CommandResult object ur which is the result of undoing the undoable modifications previously carried out by uc. ur is then returned by the undoIfMustUndo method.
An example of an UndoableCommand is AddCommand, which adds a person to the records. Calling the undo method of an AddCommand object ac causes the previously added Person object person to be deleted. ac does this by calling the deletePerson method of the Model instance m to delete person.

Design considerations:
Aspect: How undo executes:
-
Alternative 1: Saves the entire address book.
- Pros:
- Easy to implement.
- Cons:
- May have performance issues in terms of memory usage.
- Pros:
-
Alternative 2 (current choice): Individual command knows how to undo by itself.
- Pros:
- Will use less memory (e.g. for
delete, just save the person being deleted). - Execution is different for each command so specific execution can be fine-tuned for each individual command.
- Will use less memory (e.g. for
- Cons:
- We must ensure that the implementation of each individual command are correct.
- Pros:
Add Panel to the UI
Implementation
The adding Panel mechanism is facilitated by MainWindow.fxml. It extends the MainWindow with one more main panel, making it easier to render Group list and Task list at the same time.
Overall, .fxml files uses different kind of containers to organize the structure of the file. The main window of the application, which is MainWindow.fxml, uses VBox (Vertical Box), Stack Panel, and other layouts to components (e.g. CommandBox, ResultDisplay).
Therefore, the key point to implement the extension is using HBox (Horizontal Box) layout. Panels insides the layout is ordered horizontally, making two parallel display panels at the same time. To add a framework of the additional panel inside MainWindow.fxml, simply just add one more listPanelPlaceholder to the HBox, manipulated by class MainWindow.java. The final step is resizing the parent components in order to fit the additional panel nicely.
Toolkit
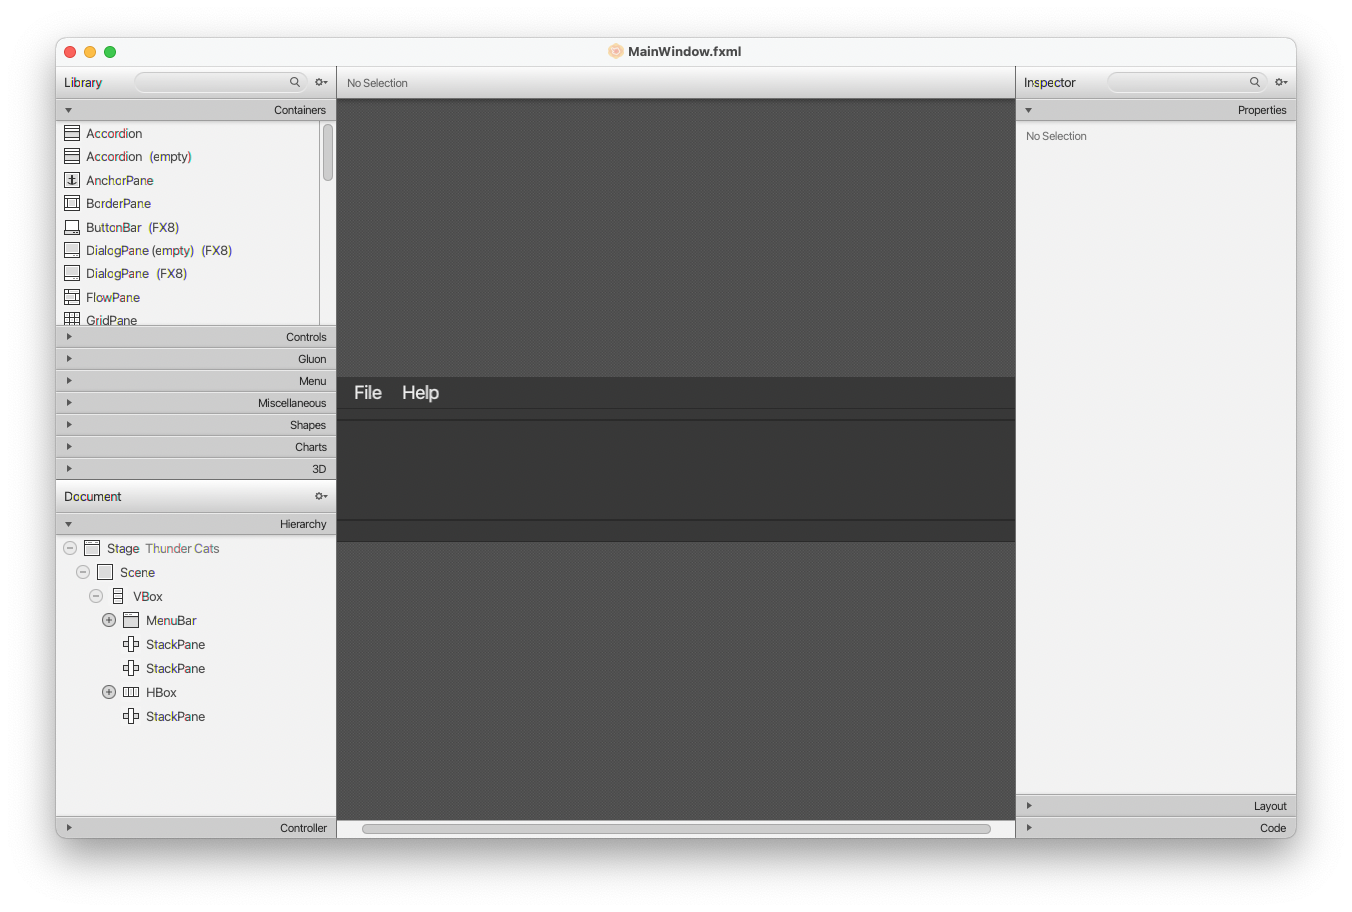
Scene Builder is written as a JavaFX application, supported on Windows, Mac OS X and Linux. It is the perfect example of a full-fledge JavaFX desktop application. Scene Builder is packaged as a self-contained application, which means it comes bundled with its own private copy of the JRE.
Application Scence Builder makes it easier to imagine and implement the feature by the running time visualization and list of possible components.
Rounded-corners UI
Implementation
The Rounded-corners UI mechanism is facilitated by DarkTheme.css. By making the rounded-corners UI, the user’s experience with the application can be enhanced significantly.
Overall, the .css files are specialized for the theme of the application. All the components including background color, font size and shape can be manipulated with this file. By referring to this online instruction and implementing it in the UI components in the theme file, those components’ corners can be altered to rounded as prefered.
Edit Group Command
The edit group mechanism is facilitated by EditGroupCommand, EditGroupCommandParser and EditGroupDescriptor. This command allows users to edit data of the selected group.
Implementation

- User enters the
editG GROUP_INDEX n/NEW_NAMEcommand, and the user input is taken intoLogicManager#execute(String commandText). -
LogicManagercalls theAddressBookParser#parseCommand(String userInput, ApplicationState currentApplicationState)method which parses the user input along with the current application state. -
EditGroupCommandParser#parse(String args)retrieves the group index from the arguments parsed then creates the EditGroupDescriptor object. - A new
EditGroupCommandobject will be created with the parameters extracted from EditGroupDescriptor and group index. -
LogicManager#execute(String commandText)checks if this command object is able to run in the current application state. This operation is exposed in the LogicManager class asLogicManager#checkIfCommandCanRunInApplicationState(Command command). - If the command is able to run, the EditGroupCommand then interacts with the Model class to edit the data. This operation is exposed in the Model class as
Model#setGroup(). Note: The UniquePersonList and UniqueTaskList from the group to be edited will also be copied over to the new group object created by the EditGroupCommand. - The
CommandResultof the execution will then be retrieved, and the display will change to show the result of the execution.
The implementations of the other Edit command which can be used to edit persons data, is similar to the EditGroupCommand in the way the Logic component behaves. A sequence diagram of EditGroupCommand is provided below for better visualisation.

The following steps describe the execution of the EditGroupCommand.
- EditGroupCommand uses the provided Index and EditGroupDescriptor to create the updated Group object.
- EditGroupCommand calls the setGroup method of the Model class to replace the previous Group object with the newly updated one.
- Model calls the setGroup function of the AddressBook to update the Group data of the AddressBook.
Adding Persons to Group Command
The add person to group mechanism is facilitated by JoinGroupCommand and JoinGroupCommandParser. This command allows forming of an association between two main data types in ThunderCat, Groups and Persons.
Implementation
- User enters the
joinG p/1 g/1command, and the user input is taken intoLogicManager#execute(String commandText). -
LogicManagercalls theAddressBookParser#parseCommand(String userInput, ApplicationState currentApplicationState)method which parses the user input along with the current application state. -
JoinGroupCommandParser#parse(String args)retrieves the group index and person index from the arguments parsed. - A new
JoinGroupCommandobject will be created with person index and group index. -
LogicManager#execute(String commandText)checks if this command object is able to run in the current application state. This operation is exposed in the LogicManager class asLogicManager#checkIfCommandCanRunInApplicationState(Command command). - If the command is able to run, the JoinGroupCommand then interacts with the Model class to edit the data. This operation is exposed in the Model class as
Model#addToGroup(). Note: If the person has already been added to the group, an error message will be displayed. - The
CommandResultof the execution will then be retrieved, and the display will change to show the result of the execution.
Any error present in the User Input will throw exceptions and this is shown in the following activity diagram.
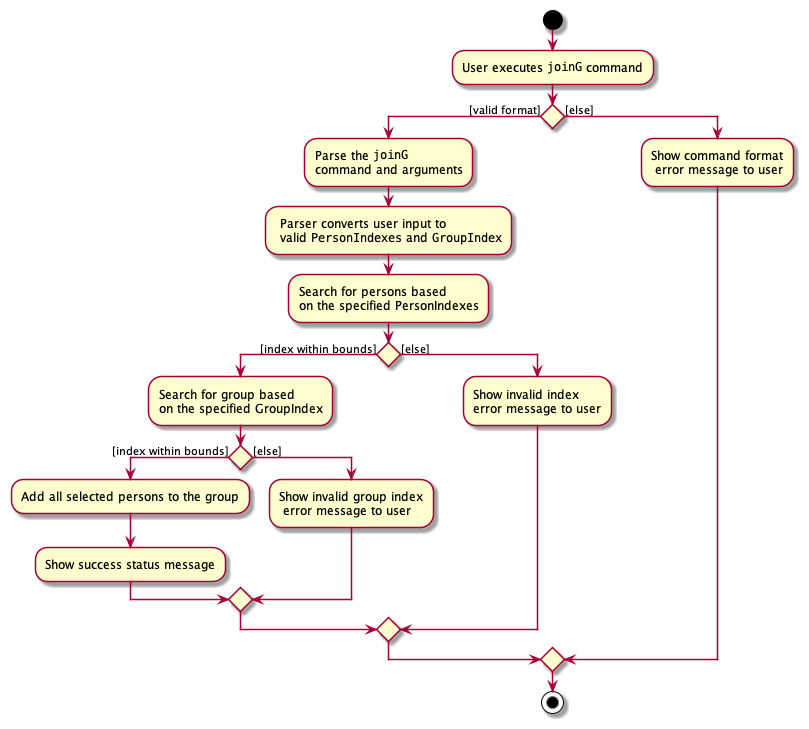
- JoinGroupCommandParser throws an exception if command format is invalid (negative/missing index, missing group prefix)
- JoinGroupCommand throws an exception if the Index does not exist in the student list. It also throws an exception if the person has already been added to the current group. The workflow for throwing these exceptions is similar to the first two and is not shown in the activity diagram below.
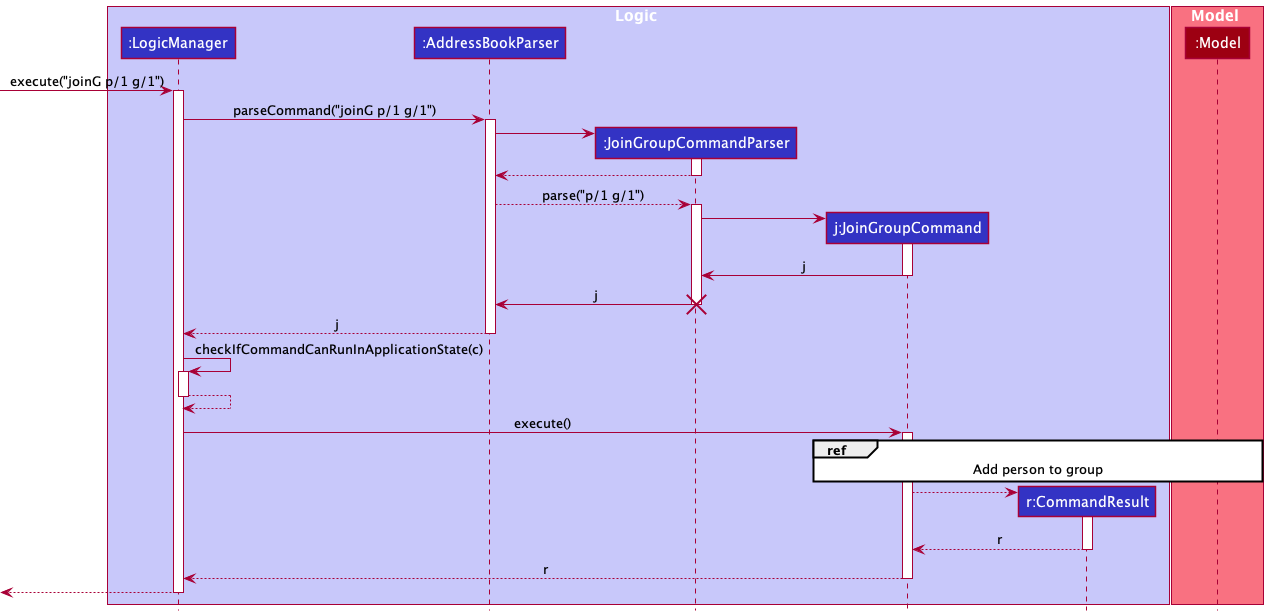
The interaction between the Logic and Model classes are shown in the following sequence diagram:

The following steps describes the execution of the joinG command:
- JoinGroupCommand uses the provided set of person indexes and Group index to obtain both a reference to all the persons (using set of person Index) and the Group (using Group Index).
-
JoinGroupCommandthen uses these references to call theaddToGroupmethod of theModelCLass which in turn calls theaddToGroupmethod of theAddressBookCLass. -
personsis obtained frompersonSetand it will be looped through until every single person in persons has been added into theUniquePersonListof thegroupToChange.
Design considerations:
- Current Implementation: Have
UniquePersonListthat storespersoninside eachGroup- Pros: Relatively Easy to implement. Relevant information of person inside Group can be easily accessed. Smaller JSON file size due to smaller volume of information being referenced to, lesser coupling due to only a unidirectional association.
- Cons: Implementing
Deleteto delete a person from contact list is slightly more complicated as they would have to search through the groups to remove this person. No information of reference between a person and a group as person contact does not store information of which group they belong in.
- Alternative: Have the
personsave a reference to the groups they are in using either groupName or groupId and have the groups they are in save a reference to them.- Pros: Able to display each person’s every group they have joined. Also able to display all the persons that joined a particular Group.
- Cons: Bigger JSON file size due to larger amount of information being referenced to. Increased in coupling between the Person and Group classes due to bidirectional association.
Documentation, logging, testing, configuration, dev-ops
Appendix: Requirements
Product scope
Target user profile:
- Year 2 Computing Student
- Taking the modules CS2103T, CS2101 and ES2660
- Has a need to manage and organise a significant number of contacts of group mates
- Has a need to manage different tasks related to different groups
- Wants to gain practical experience using CLI and manipulating JSON files
- Prefer desktop apps over other types
- Can type fast
- Prefers typing to mouse interactions to navigate applications
- Is reasonably comfortable using CLI apps
- Has other applications to message group mates
Value proposition:
ThunderCat is able to manage contacts faster than a typical mouse/GUI driven app. It centralises all information the user needs about a person and even allows users to group multiple contacts.
ThunderCat provides a practical way for users to gain confidence using a CLI to navigate an application and manipulate JSON files.
User stories
Priorities: High (must have) - * * *, Medium (nice to have) - * *, Low (unlikely to have) - *
| Priority | As a … | I want to … | So that I can… |
|---|---|---|---|
* * * |
user | have a fast and easy way to input multiple contact details of a group mate | save time when I’m doing work |
* * * |
user | input the details of my group mates in a simple command | save time when I input the information |
* * * |
user | delete a contact which will remove them from all groups within my address book in case there is a change of groupings | - |
* * * |
user | directly change details in the address book from the JSON file | gain confidence in using JSON files |
* * * |
user | only have a few basic commands to use my address book | - |
* * * |
user | use a CLI to control the application | gain confidence in using commands to navigate an application |
* * * |
user | remove contacts from my project group | remove them when there is a change in group members |
* * * |
user | create groups | locate group mates easily |
* * * |
user | list all groups | have a overview of all the groups |
* * * |
user | delete a group | remove them once they are not needed anymore |
* * |
user | easily access the contacts of my group mates, for centralising all the contact details | I can access them when I need them on my laptop |
* * |
user | input shared links of project groups (tele chat, msteams grp etc) | have all documents/information of my group on 1 place and don’t have to spend a long time to find these details/documents |
* * |
user | access my group mates’ contacts with a hyperlink | single tap to copy to clipboard. |
* * |
user | be able to archive contacts of old group mates once a project is over | - |
* * |
user | categorise by different group projects | - |
* * |
user | find project members by categories | - |
* * |
user | have a visually bright address book | lift my mood amidst the tiresome group projects. |
* * |
user | be able to update the contacts of my group mates | update them if I have keyed them in wrongly or they have been changed |
* * |
student with many contacts | be able to search for their contact by date/time created | - |
* * |
student with many groups | be able to search for a module by date/time created | - |
* * |
user | be able to search through the bulk of contacts using their name | search with more efficiency |
* * |
user | be able to use my computer to search for contacts | use my computer instead of my phone which is more convenient for a heavy computer user |
* * |
student rushing deadlines | have more than one way of contacting one person (emergency contact) | reach him in times of emergency |
* * |
user | be able to see my overlapping groups with a person | - |
* * |
user | be able to star/favourite a group as a way of categorising people | find them more easily |
* * |
user | divide my contacts to many different types | see each type when it is needed |
* * |
user | look for my contact by it’s type, group | I can find it when i cannot remember the name |
* * |
user | automatically imports the contact from my current contacts | avoid typing it all over again |
* * |
user | be able to set reminders | so that I will remember to perform a task for this contact |
* * |
user | find what groups are associated with a module | find details of any of those groups |
* * |
student taking modules | find a module by searching for its code | I can find its details |
* * |
student taking modules | find a module by searching for its name | I can find its details |
* * |
student doing modules with group projects | find what modules a group is associated with | - |
* * |
student doing modules | update module details | - |
* |
student doing group projects | find out what tasks need to be done in the group project | - |
* |
student doing group projects | find out what tasks was assigned to each group member | - |
* |
student doing group projects | I can find out what tasks that were assigned are not yet done | - |
* |
student doing group projects | reassign tasks to indicate somebody else is doing them now | - |
Use cases
(For all use cases below, the System is the ThunderCat AddressBook and the Actor is the user, unless specified otherwise)
Use case: UC01 - View basic instructions
MSS
- User enters help command into the terminal or clicks “help” button.
- ThunderCat opens the instruction page for the user.
Use case ends.
Use case: UC02 - Add a new person without the optional address and tags
MSS
- User enters the person’s name, phone number and email to be added into the terminal.
- ThunderCat announces that the person has been successfully added.
Use case ends.
Extensions
- 1a. ThunderCat detects an error in the entered command format.
- 1a1. ThunderCat requests for the correct command format, and gives examples
- 1a2. User enters a new command.
Steps 1a1-1a2 are repeated until the command format entered are correct.
Use case resumes from step 2.
- 1b. ThunderCat detects that the person already exists in the application.
- 1b1. ThunderCat announces that the person already exists.
- 1b2. Use case restarts from step 1.
Use case: UC03 - Edit an existing person’s phone number
MSS
- User enters the phone number replacing the current contact’s phone number into the terminal.
- ThunderCat announces that the person’s phone number has been successfully edited.
Use case ends.
Extensions
- 1a. ThunderCat detects an error in the entered command format (UC02 -extension 1a).
Use case: UC04 - Delete a Person
MSS
- User enters the displayed person index to delete into the terminal.
- ThunderCat announces that the person has been successfully deleted.
Use case ends.
Extensions
- 1a. ThunderCat detects an error in the entered command (UC02 - extension 1a).
Use case: UC05 - Add a new Group
MSS
- User enters the group name and description to be added into the terminal.
- ThunderCat announces that the group has been successfully created.
Use case ends.
Extensions
- 1a. ThunderCat detects an error in the entered command (UC02 -extension 1a).
- 1b. ThunderCat detects that the group already exists in the application.
- 1b1. ThunderCat announces that the group already exists.
- 1b2. Use case restarts from step 1.
Use case: UC06 - Edit an existing group’s description
MSS
- User enters the description replacing the current group’s description into the terminal.
- ThunderCat announces that the group’s description has been successfully edited.
Use case ends.
Extensions
- 1a. ThunderCat detects an error in the entered command format (UC02 -extension 1a).
Use case: UC07 - Delete a Group
MSS
- User enters the displayed group index to delete into the terminal.
- ThunderCat announces that the group has been successfully deleted.
Use case ends.
Extensions
- 1a. ThunderCat detects an error in the entered command (UC02 - extension 1a).
Use case: UC08 - Add a Person to a Group
MSS
- User enters the adding command into the terminal.
- ThunderCat announces that the person has been successfully added.
Use case ends.
Extensions
- 1a. ThunderCat detects an error in the entered command (UC02 -extension 1a).
- 1b. ThunderCat detects that a person specified is already in the group.
- 1b1. ThunderCat announces that the person is already in the group and the person index is not valid.
- 1b2. ThunderCat requests for a valid person indexes to be input.
Steps 1b1-1b2 are repeated until all person indexes input are valid.
Use case resumes from step 2.
Use case: UC09 - Remove a Person from a Group
MSS
- User navigates to the group which the user want to remove person from.
- User enters the displayed index of the person they want to remove into the terminal.
- ThunderCat announces that the person has been successfully removed from the group.
Use case ends.
Extensions
- 1a. ThunderCat detects an error in the entered command (UC02 -extension 1a).
- 1b. ThunderCat is unable to find the group with the given index.
- 1b1. ThunderCat requests for a valid group index and gives examples
- 1b2. User enters a new command with a valid group index.
Steps 1b1-1b2 are repeated until the group index entered is valid.
Use case resumes from step 2.
- 2a. ThunderCat detects an error in the entered command (UC02 -extension 1a).
- 2b. ThunderCat is unable to find the person with the given index.
- 2b1. ThunderCat requests for a valid person index and gives examples
- 2b2. User enters a new command with a valid person index.
Steps 2b1-2b2 are repeated until the person index entered is valid.
Use case resumes from step 3.
Use case: UC10 - Add a Task to a Group
MSS
- User navigates to the group which the user want to add tasks to.
- User enters the task to be added to the group into the terminal.
- ThunderCat announces that the task has been successfully added to the group.
Use case ends.
Extensions
- 1a. ThunderCat detects an error in the entered command (UC02 -extension 1a).
- 1b. ThunderCat is unable to find the group with the given index (UC09 -extension 1b).
- 2b. ThunderCat detects that the task already exists in the group.
- 2b1. ThunderCat announces that the task already exists.
- 2b2. Use case resumes from step 2 again.
Use case: UC11 - Mark a Task as Done
MSS
- User navigates to the group in which the user wants to mark task as done in.
- User enters the task index to be marked as done into the terminal.
- ThunderCat announces that the task has been successfully marked as done.
Use case ends.
Extensions
- 1a. ThunderCat detects an error in the entered command (UC02 -extension 1a).
- 1b. ThunderCat is unable to find the group with the given index (UC09 -extension 1b).
- 2b. ThunderCat detects that the task has already been marked as done.
- 2b1. ThunderCat announces that the task has already been marked as done.
- 2b2. Use case resumes from step 2 again.
Use ase: UC12 - Undo after accidental clear command
MSS
- User clears the ThunderCat application and all its stored data.
- User undoes the action.
- ThunderCat announces that the task has been successfully undone.
Use case ends.
Non-Functional Requirements
- Should work if Java
11or above is installed. - Should be platform-independent, minimally working on any mainstream OS.
- Should be able to hold up to 1000 records (persons, groups, etc.) without a noticeable sluggishness in performance for typical usage.
- A user with above average typing speed for regular English text (i.e. not code, not system admin commands) should be able to accomplish most of the tasks faster using commands than using the mouse.
- Should be intended for use by a single user.
- Data should be stored locally.
- Data should be stored in a human-editable format.
- Data should not be stored with a database management system.
- Should be portable; it should not require any installer.
- Should not depend on a remote server to function.
- Should have a GUI that works well for screen resolutions 1920x1080 and higher.
- Should have a GUI that works well for screen scales of 100% and 125%.
- Should have a GUI that is still usable for screen resolutions 1280x720 and higher.
- Should have a GUI that is still usable for screen scales of 150%.
- Should be packaged into a single file, ideally a JAR file.
- Should have a total app size of at most 100 MB.
Glossary
- Mainstream OS: Windows, Linux, Unix, OS-X
- API: Application programming interfaces, or APIs, simplify software development and innovation by enabling applications to exchange data and functionality easily and securely.
Appendix: Instructions for manual testing
Given below are instructions to test the app manually.
Launch and shutdown
-
Initial launch
-
Download the jar file and copy into an empty folder
-
Double-click the jar file Expected: Shows the GUI with a set of sample contacts. The window size may not be optimum.
-
-
Saving window preferences
-
Resize the window to an optimum size. Move the window to a different location. Close the window.
-
Re-launch the app by double-clicking the jar file.
Expected: The most recent window size and location is retained.
-
Adding a person
-
Adding a person while in the home page with all contacts being shown.
- Prerequisites:
- List all persons using the
listcommand. This will navigate you to the home page. - An exisiting contact with these details:
Name: John Doe, Phone: 98765432, Email: johnd@example.com
- List all persons using the
-
Test case:
add n/Johnny Simpson p/85432617 e/johnnyS@example.com a/311, Clementi Ave 2, #02-25
Expected: The contact with the corresponding details are added to the displayed person list. Details of the added person is displayed in the result box. -
Test case:
add n/John Doe p/98765432 e/johnd@example.com
Expected: No person is added. Error details is shown in the result box. Error message of “Person already exists in the address book” is shown in the result box. Displayed person list remains the same. -
Test case:
add n/Kenny
Expected: No person is added. Error details is shown in the result box. Error message of “Invalid command format!” is shown. Followed by an example of how the correct command input format should be. Displayed person list remains the same. - Other incorrect delete commadns to try:
add p/55,add d/hello(where the command format is not as specified in the user guide)
Expected: Similar to previous test case result(Test case iv).
- Prerequisites:
Deleting a person
-
Deleting a person while in the home page with all contacts being shown.
- Prerequisites:
- List all persons using the
listcommand. This will navigate you to the home page. - Multiple persons in the list.
- List all persons using the
-
Test case:
delete 1
Expected: First contact is deleted from the displayed person list. Details of the deleted contact shown in the status message. -
Test case:
delete 0
Expected: No person is deleted. Error details shown in the status message. Error message of “Invalid command format!” is shown. Followed by an example of how the correct command input format should be. Displayed person list remains the same. - Other incorrect delete commands to try:
delete,delete x,...(where x is larger than the list size)
Expected: Similar to previous.
- Prerequisites:
-
Deleting a person after filtering the displayed person list by searching for name.
- Prerequisites:
- List all persons using the
listcommand. This will navigate you to the home page. - Multiple persons already present in the list.
- Add a contact using the
addcommand. Specificallyadd n/John Doe p/98765432 e/johnd@example.com. - Ensure that “John Doe” does not have a displayed index of 1 when using the
listcommand. - Use the
findcommand and make sure “John Doe” now has the displayed index of 1.
- List all persons using the
-
Test case:
delete 1Expected: First contact is deleted from the displayed person list. Details of the deleted contact shown in the status message. “John Doe” is deleted from the address book. - Test case
- Prerequisites:
Adding a person to a group
-
Adding a person to a group while in the home page with all contacts being shown.
- Prerequisites:
- List all persons using the
listcommand. This will navigate you to the home page. - 3 contacts present.
- 3 groups present.
- List all persons using the
-
Test case:
joinG p/1 p/2 g/1
Expected: The first and second person in the displayed person list are added to the first group in the displayed group list. Details of the group which had people added to it, is displayed in the result box . -
Test case:
joinG g/1
Expected: No person is added to the first group. Error details is shown in the result box. Error message of “Invalid command format!” is shown in the result box. -
Test case:
joinG p/1
Expected: Similar to previous test case result( Test case 1.3 ). - Other incorrect delete commands to try:
joinG p/52 g/1,joinG p/1 g/55,joinG p/0 g/0(where the command format is not as specified in the user guide. The indexes provided are out of bounds of the indexes displayed in the application.)
Expected: Similar to previous test case result( Test case 1.3 ).
- Prerequisites:
-
Adding a person to a group while in the home page without any contacts present.
- Prerequisites:
- 0 contacts present.
- 1 group present.
- Test case:
joinG p/1 g/1Expected: Similar to previous test case result ( Test case 1.3 ).
- Prerequisites:
-
Adding a person to a group while in the home page without any group present.
- Prerequisites:
- 1 contact present.
- 0 group present.
- Test case:
joinG p/1 g/1Expected: Similar to previous test case result ( Test case 1.3 ).
- Prerequisites:
Effort
AddressBook Level-3 (AB3) only uses Person entities, but now we deal with Group and Task entities in addition to Person objects, each with their own attributes. This was more difficult than AB3 because we had to also add commands to create, read, update, and delete all of them. We also had to maintain an application state for the Home and Group Information pages. This was more difficult than AB3 because AB3 only has one page. Furthermore, our pages each have two list panels, and they are displaying different types of data (Person, Group, Task), unlike AB3 which has only one list panel to display only Person cards for objects. We also had to ensure that in certain pages, certain commands don’t run if they did not make sense to run. This was difficult more difficult than AB3 because in AB3, all commands can run, and they do not depend on the application state.